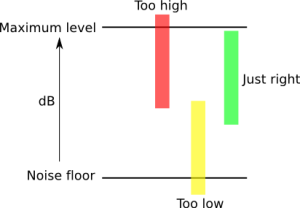
So Let’s talk about Microphone placement and Gain structure.
As the proud owner of www.MicrophoneRepair.com, I receive many calls and Emails from all over the world and I am very grateful for the people who contact me. I feel very honored that people want and trust my opinion.
There is a topic that comes up very often that I would like to share with you, and it kind of goes like this:
“Hi David,
I wonder if you could tell me how a microphone starts to sound when it’s time to be serviced
My Neumann large diaphragm condenser seems distorted.
But If I step back a little bit it seems to go away. Do you think I might be overdriving it or if the capsule may need to be replaced”?
Well, I am very fortunate to have a lot of experience as an audio engineer and studio technician as well as repairing microphones.
I can tell you that a common problem that I have seen over and over again is that the analog mic-pre is turned up too high and the output of the pre is down too low.
Most microphone preamplifiers have a lot of gain and it is very easy to overdrive the electronics or the tube on the input of the mic-pre that comes right after the mic-pre gain pot.
I usually suggest to start by turning the mic-pre input as close to all the way down as possible and then turn up the output of the mic-pre as close to all the way up as possible.
I try to get the microphone and mic-pre sounding great before I insert any outboard gear or plug- ins. After I do all this is when I patch in some toys if needed. Often I will come out of mic-pre into a limiter out of the limiter into an EQ device and then back into the line input of the console. I personally like to use this concept in most gain structure applications including when I am working with an analog console and not in the box. I usually turn all of the line inputs all the way down and the stereo buss all of the way up and I adjust my gain to the stereo buss by the output faders on each track. Doing things this way gives you much better signal to noise ratio as well as cleaner sounding mixes.
Working like this is “Old School” and many of the up-and-coming engineers do not seem to understand the concept and importance of gain structure.
Now, let’s talk a little about microphone placement when doing vocals.
Most large diaphragm condenser microphones are a lot more durable then one might think. Most capsules will take a lot of SPL as long as the placement is good.
Where we get in trouble is when we hit the microphone amplifier too hard, so don’t be shy and make use of the microphone pads that are in most high end microphones if needed.
Also always use a nylon or foam type pop filter. One trick that I have learned is to take a metal type of filter like a Stedman and then put a pair of nylon stockings around it and cut to size.
If you place a pop filter about 6 to 8 inches back from the microphone it forces the talent to back up from the front of the microphone about 10 inches.
This application of mic placement will keep your microphone capsule a lot cleaner and keep it from getting moisture sensitive.
I hope that some of you find this article helpful.
Happy recording and feel free to contact me through my web site if you have any questions that you think I may be able to answer for you.
I always enjoy hearing from all of you, you can click this link to find out how to contact me.
David Brown : 818-874-9895
www.MicrophoneRepair.com
